Intro to Matinee

Two basic things you can do with Matinee are animate actors in the level and also create cinematics with cameras. We will do both starting with a simple animation.

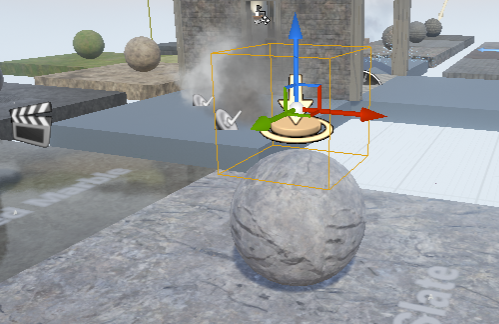
Here we have a ball in a starter content map. I placed a trigger on top of it. Then in the cinematics tab at the top of the viewport I added a matinee. You can see the actor icon to the left of the ball.

triggerAndBallSetup

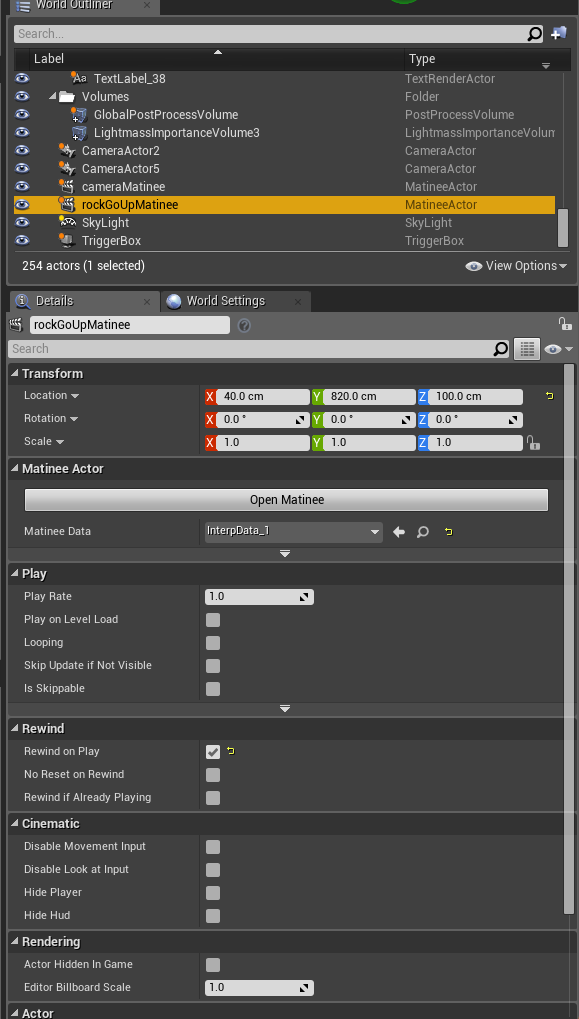
I called my matinee actor “rockGoUpMatinee” and set it to “Rewind on Play” so that it will play every time I hit the trigger.

inLevelAnimationMatineeSettings

In the matinee I right clicked on the “Tracks” section and added an empty group I called “rockGoUp.” To that group I added a movement track by right clicking on it and also I added the rock actor by having it selected in the viewport and going to “add actor” in the rockGoUp empty group.

Then, with the rock selected in its initial position, and the movement track selected in Matinee, I hit the enter key and set my first key frame (the red triangles).

Then I scrubbed ahead a bit, moved my rock up in the air, made sure it and the movement track where selected, and hit enter again to set the second keyframe. I moved to the end of the timeline, moved the rock down, selected movement and the rock and hit enter to set my last keyframe.

simpleMatineeMovementSetup

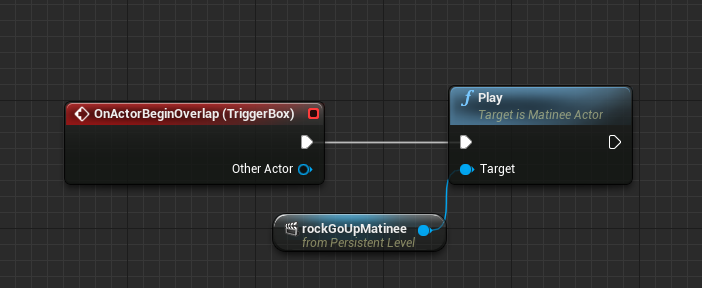
Lastly, in my Level Blueprint, with the trigger volume selected, I made a BeginOverlap event for it. Then with the matinee actor selected, I created a reference to that and then pulled out the pin and typed “Play” to get the play node to show up. Now, in the level whenever I step on top of that rock it will shoot up and then back down.

triggerEventStartsMatinee


Next we can also create a cinematic intro to our level. To do this we create another matinee actor in the level. In the matinee I right clicked in the tracks section and created a camera group. This automatically creates a camera in the level (this doesn’t show up when playing). I named my camera group IntroCamera and right clicked on it to also create a DirectorGroup. Then, with my camera selected in the level and also the movement track selected in my camera group, I hit enter to set the first keyframe. Then I scrubbed ahead halfway through the movement track timeline, moved my camera across the level and then with the camera and movement track selected, hit enter to set the 2nd keyframe. I repeated those steps to set the third keyframe. Lastly, with the director group selected above, I hit enter and selected my IntroCamera group to be placed.

matineeSetupForCamera


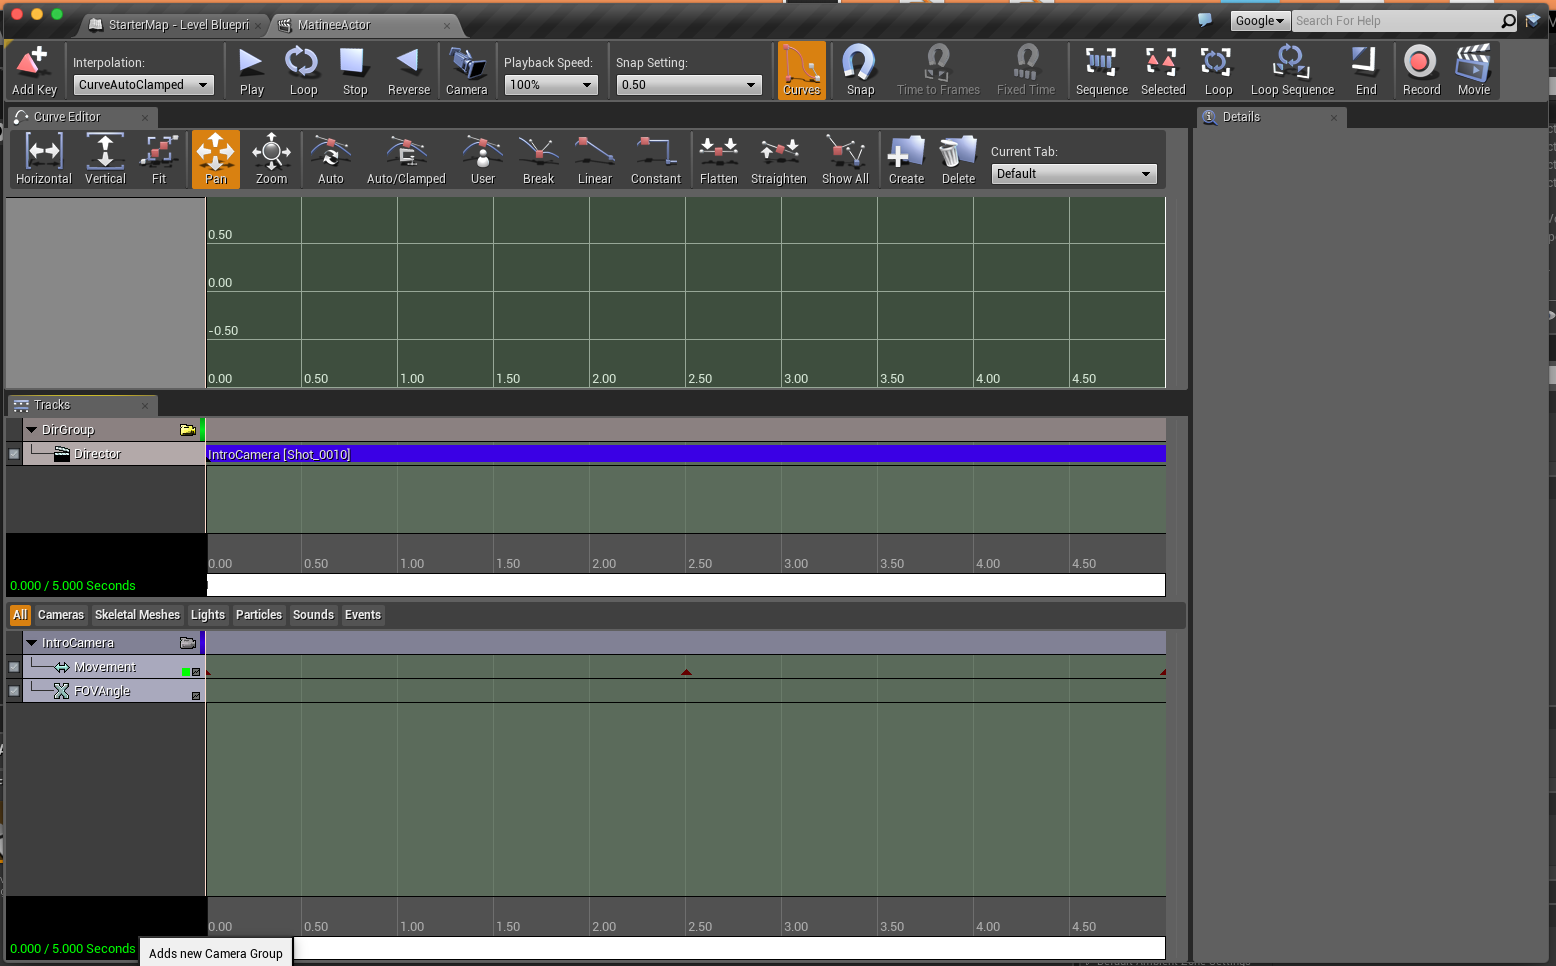
You can see how this looks in the level. The camera is on top and the matinee actor is below it. Also when you select a camera you can get a thumbnail of what it is viewing in the lower right hand corner of the screen. whatGoesInLevel

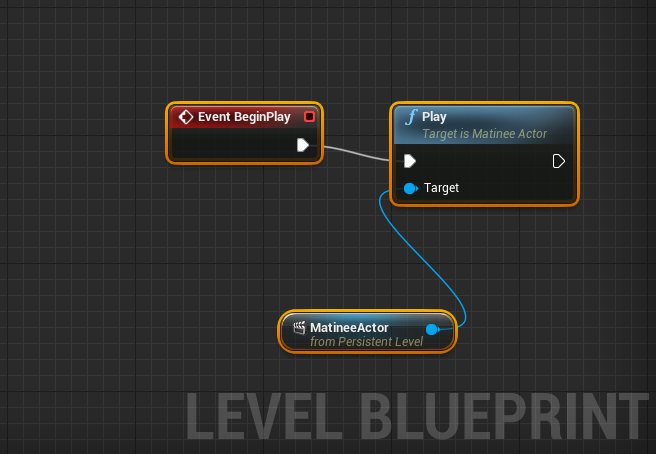
Lastly, we want this animation to start as soon as we begin the level and we do not want it to loop so we don’t need to set that up as we did above. Thanks to the director track, this animation will temporarily take over the ThirdPersonPlayerBlueprint and run from the camera’s point of view. With the MatineeActor selected in the level, I open my level blueprint, right click on the the grid and do “Add Reference to MatineeActor.” Then I pull out that pin and type play and connect the play node to an Event BeginPlay.

whatGoesInLevelBlueprint

Using a Timeline in Blueprints to Make a Moving Platform

In this example we’re making a simple platform that, when the player walks on it, goes up, holds for a short moment and moves back down.

1

Here is the Actor Blueprint setup in the Viewport. I added SM_AssetPlatform from the starter content but you can use anything. First I made sure that I had some collision on it. Then, as a parent of the platform, I added a small box collision volume on top. When the user overlaps with that volume, the Blueprint script below is activated.

2

I am using a Timeline node. A timeline will run for however long you wish changing a variable during that time. (You can set up your timeline by clicking on it, see below). Here I am taking the original position of the platform as it’s placed in the level and storing it in a vector variable I named ‘originalPos’. Then I am breaking up the three floats from that vector as we only want to move the Z (up and down) position. Using the timeline I am then adding 300 units to the Z position and then putting it back down to 0. I attach that to a SetActorLocation node from the update on the Timeline.

3

Here you can see what the timeline editor looks like. It opens up in a new tab from my blueprint. I added a float variable by clicking on the f+ icon in the upper left (vectors, events and colors are some of the other things you can add to a timeline). You can click on the red line to make new keyframes in the timeline to change your variable around. You can also right click on the frames to get different interpolation. Here I am using “User” so I can get a smoother graph so the animation isn’t too jerky.

4

UMG continued

We’re doing a version of the Unreal tutorial on menus taken from here: https://docs.unrealengine.com/latest/INT/Engine/UMG/QuickStart/3/index.html

The intro menu to a game is actually a separate level in itself.

Here is what our demo menu looks like in the viewport. There are a few things to notice: I added just Atmospheric Fog to the scene to give the menu something in the background. Also in world settings I overrode the normal game mode and set the default pawn class to a blank “Character” instead of “ThirdPersonCharacter.” This is so when we “play” this level, there’s no character running around. You can see my file structure below in the content browser. I also added a font.

umgMenu1

Here is what the menu looks like in UMG. It’s a bit chaotic but the instructions are hidden when we start the menu. Notice with the buttons, in the options on the bottom right, I created an OnClicked event. Another important thing to notice is in the details panel on the upper right part of the screen, I titled the button and also “Is Variable” is checked. That is checked by default with the buttons but I also checked it for the title text so I could hide it in my graph. (Of course while you’re working you don’t have to have it look like this. You can turn things off by clicking the eye icon to the right of the name)

umgMenu2

Now here is the graph for the menu. Those events got created when I turned them on in the Designer options. Pretty simple logic. On startup, I hide the instructions and the back button. When we hit play, level_1 opens, when we click “how-to” everything is hidden and then the instructions and the back button are showing. When the back button is pressed we reverse that and hide the instructions and back button and show everything else. The quit button just does a console command to quit the game. Notice I also have a “title” variable. I made this by selecting the text of my title (Alien Afterlife) and in the upper right of the details panel I gave the text a title and clicked on “Is Variable.” This allowed me to get it in the graph so I could hide it.

umgMenu3

Once you’re done making the widget menu, you can turn it on in the Level Blueprint on Event BeginPlay. Notice I also had to turn on the mouse cursor by pulling up the Player Controller.

umgMenu1.5


Lastly, let’s look briefly at our Project Settings. This is found in Edit —> Project Settings. This is where we can tell the game that we want to start with the menu first. We’ll look a lot more at Project Settings later as there are a few things to set up before you do a build.

umgMenu4

(from class – some logic for a pause menu that appears and disappears by pressing “m”)
Screen Shot 2016-03-31 at 3.38.59 PM
Intro to UMG (Unreal Motion Graphics) Widgets

In this example we are making two widgets and one blueprint.

The Blueprint is a burning bush. When the player runs into it, some text is displayed on the screen, the player loses 0.1 in health and is launched back a little bit.

Widget 1 is the text that gets displayed when the player collides with the bush blueprint. This is called up and removed in the bush blueprint.

Widget 2 is a health bar displayed in the upper left corner. This gets called up in the player Blueprint and is always on.


screenGrab

Below is the UMG interface. I added a progress bar to the slate and clicked “Bind” in the place circled.
healthBarUMG

Below you can see what is in the graph for the progress bar binding. I am just casting to the 3rd person blueprint and getting the player’s health.

healthBar

Then I call the health widget up in the 3rd person Blueprint under Event Begin Play:

firstPersonBluePrint

This is the most programming we need to do. Below you see the burningBush Actor Blueprint. Under Event Begin Play I make a variable for the text widget. When the player overlaps with burningBush, first I check to make sure the widget isn’t already displayed. If it’s not, I put it up for a second, cast to the player, make him lose health, launch him back for a bit, and then remove the text:
bushWidget

Intro to Making Enemies/Having Player Health

3-24_bad_guy

(click image for full blueprint.)

In this example we’re learning a few new concepts.

  1. New Variables. We are using a float to keep track of player health. A float is a number with a decimal point (1.4, 4393.394, 2.39282, etc). Here the player starts with a health of 1 and it decreases by .2 with each hit. Floats are green.
  2. We are also using vectors to store locations. A vector is just three floats together that tells the game where something is located on the x, y and z axis. Vectors are yellow.


(Default variable values are: vectors are 0,0,0 and the boolean is set to true. Health is set to 1.0)

We also are using a “simple move to actor” to make a bad guy run toward the player. The bad guy must have a “Nav Mesh Bounds Volume” around him and it must be built by pressing the letter ‘p’ on the keyboard.

Then when the vectors of the bad guy and the player are close enough to being equal (by 80 units here) the player loses .2 in his health float variable.

Then we do some basic logic things with branches. Since all of this is on an event tick, it is happening very quickly. We want the player to only lose .2 in health when he is hit and not .2 every tick. So we need to stop counting for a bit and give him time to get away.

Also we want the level to start over if he loses all his health. So when his health is <= 0 movement is stopped and the level is restarted with a console command “restartLevel.”

Collecting coins/Keeping Score

Example one – we could really put this in any Blueprint that gets called into the level. We’ll put it in the ThirdPersonCharacter blueprint. Notice I also made a key pressed event to trigger this. I just right clicked in the event graph and typed ‘p’.

Responsive image

Example Two – now we can use this logic in a more real way to add up how many times the player runs into a token that’s placed in the level. This is in our own Actor Blueprint we created in the content browser, named it “token”and placed a mesh into it in the viewport. Once we add all the logic below we can see it work by dragging the “token” actor blueprint into the level.

Here we’re also doing something new called “casting.” That’s when you go into another blueprint that is part of your game and get and set variables. Here we’re casting into the player character blueprint and adding up the score variable. Responsive image

In addition to casting and the key pressed event we’re learning two of our first variables here:

  1. Integer – (dark green color) which is just a number with no decimal point (examples: 4, 566455, 2, 0, -39392, -3, etc)
  2. Boolean –  (dark red color) which can only be true or false (0 or 1) We check the boolean with a “branch” node.
  3. Here is a little more about variables.

Challenge – how can we make a level where a player has to collect ten tokens to advance to the next level?

Here is a small version of that:

A little more explanation as to why we are doing casting – if we just put all the variables in the Coin_BP each coin actor would only add up their overlap so you would get 1 printed to the screen every time you find a coin. Casting to another BP such as the player character allows us to have a place to store this information. There are a lot of other ways to do this but for now this is the simplest.

Also – at the end of the video I’m duplicating the coin BP by holding down alt when I move it.

Using Trigger Volumes

Screen Shot 2016-03-10 at 3.55.38 PM

When you walk through a trigger volume, some text gets printed out, there’s an explosion and a new level opens.

This is happening in the level blueprint.